Table of Contents
When it’s cold outside, nothing warms us up like a hot bowl of homemade soup. But did you know these soups can do more than just taste good? They can also boost your health, from fighting off sickness to helping with weight loss.
Are you ready to find new, tasty, and healthy soup recipes? Get ready to be amazed as we show you a variety of soups that will become your family’s new favorites.


Imagine making a simple soup that not only tastes great but also makes you feel good. A world where your favorite soups are full of good stuff like vitamins and antioxidants is real. It’s waiting for you to start exploring.
Key Takeaways
- Homemade soups offer a wealth of nutritional benefits compared to store-bought options.
- Soup recipes can be tailored to support specific health goals, from weight management to immune system support.
- Incorporating a variety of fresh, wholesome ingredients into your soup-making can unlock a world of delicious and nourishing possibilities.
- Mastering a few essential kitchen tools and techniques can help you create the perfect homemade soup every time.
- Exploring international flavors and culinary traditions can introduce you to a diverse array of healthy soup recipes to enjoy.
The Health Benefits of Homemade Soups
Homemade soups are packed with health benefits. They are nutritious and add joy to any meal. These soups keep important nutrients from fresh ingredients. They also help with digestion and weight management.
Nutrient Retention in Fresh Ingredients
Using fresh ingredients in homemade soup keeps more nutrients than canned or packaged soups. Vegetables, herbs, and other produce stay full of vitamins and minerals. This means your body gets a lot of good stuff with each spoonful.
Hydration and Digestive Benefits
Soups are great for staying hydrated. They provide the body with the fluids it needs. The warm, soothing nature of homemade soup helps digestion by making digestive enzymes and promoting regular bowel movements.
The fiber in many soups also supports gut health and regularity.
Weight Management Advantages
Adding nutrient-dense soups to your diet can help with weight management. Soups are low in calories but fill you up, which can lower your calorie intake. The hydration, fiber, and nutrients in homemade soups also boost metabolic health and support weight loss.

Essential Kitchen Tools for Perfect Soup Making
Making delicious soups needs the right tools. You’ll need sturdy soup pots and precise cutting boards. These tools are key to making your soups perfect. Let’s look at the must-have items for every home chef.
The Importance of a Quality Soup Pot
A good soup pot is crucial for any soup recipe. Choose a heavy-duty, high-quality pot. Stainless steel or enameled cast iron pots are great. They heat evenly and last a long time.
Sharp Knives for Efficient Chopping
A sharp chef’s knife is essential for soup making. A good knife makes chopping vegetables easy. You’ll also need a sturdy cutting board for safe food prep.
Embrace the Convenience of an Immersion Blender
An immersion blender makes creamy soups easy. It blends ingredients right in the pot. This saves time and effort compared to using a traditional blender.
The Humble Ladle: A Soup-Making Essential
A reliable ladle is a must for soup making. It helps serve and portion soups perfectly. This ensures each bowl gets the right amount of broth and ingredients.
| Kitchen Tool | Purpose | Recommended Features |
|---|---|---|
| Soup Pot | Simmering and cooking soups | Heavy-duty, high-quality material (stainless steel or enameled cast iron) |
| Chef’s Knife | Dicing, slicing, and mincing vegetables | Sharp, well-maintained blade |
| Cutting Board | Providing a stable surface for chopping | Large, durable, and easy to clean |
| Immersion Blender | Blending and puréeing soup ingredients | Powerful motor and various blade attachments |
| Ladle | Serving and portioning soup | Long handle for easy reaching and scooping |
Having these essential tools will help you make delicious soups. Invest in quality, and enjoy making soup perfection.

Understanding Basic Soup Bases and Broths
Every delicious soup starts with a flavorful base or broth. Learning about these basics can make your soups better. We’ll look at vegetable stock, bone broth, and the difference between clear and cream-based soups.
Vegetable Stock Fundamentals
Vegetable stock is great for many soups because it’s full of nutrients. To make it, boil onions, carrots, celery, and herbs in water. The longer it cooks, the tastier it gets.
Using different vegetables makes the stock taste better.
Bone Broth Preparation
Bone broth is packed with collagen, minerals, and amino acids. To make it, cook bones in water for hours or even days. This process pulls out lots of nutrients, making the broth very flavorful and healthy.
Clear vs. Cream-Based Foundations
Choosing between clear or cream-based soups depends on what you like. Clear broths, like vegetable or bone broth, are light and let the flavors of the ingredients shine. Cream-based soups, with milk or cream, are rich and creamy.
Knowing how to make these soup bases and broths will help you make tasty and healthy soups. You can choose what suits your taste and diet best.
Best Healthy Soup Recipes for Beginners
Starting a healthy eating journey can feel overwhelming. But, making easy soup recipes is a great way to get started. These soups are tasty and full of nutrients to help your body stay healthy.
The Classic Tomato Basil Soup is perfect for beginners. It’s made with simple ingredients like fresh tomatoes, basil, and garlic. This soup is creamy, vibrant, and sure to please.
The Lentil and Vegetable Soup is another great choice. Lentils are rich in protein, fiber, and vitamins. This soup mixes tender lentils with colorful veggies for a filling meal.
- Creamy Butternut Squash Soup
- Chicken Noodle Soup with Homemade Broth
- Minestrone Soup with Whole-Grain Pasta
These easy soup recipes are not only tasty but also easy to make. They let you enjoy cooking and the satisfaction of a healthy meal. So, get creative and try these beginner-friendly soups today!
Immune-Boosting Vegetable Soup Variations
Nourishing vegetable soups are great for your immune system. They can be made with ingredients that boost immunity. This way, you get tasty and healthy soups that strengthen your body’s defenses.
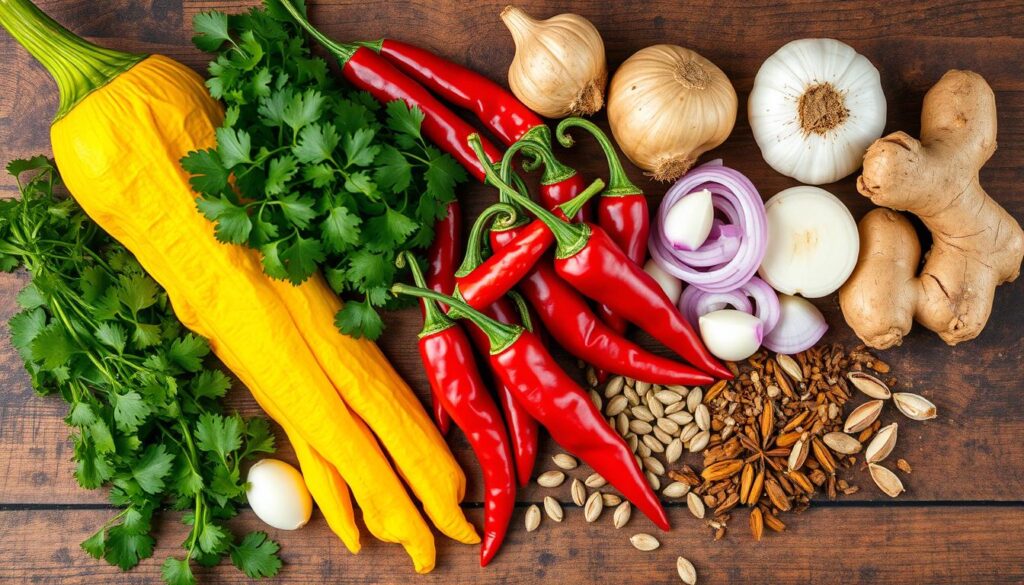
Garlic and Ginger Combinations
Garlic and ginger are super for your immune system. Together in a soup, they add flavor and health benefits. Garlic has allicin, which fights off microbes and viruses. Ginger is full of antioxidants and anti-inflammatory stuff.
Antioxidant-Rich Ingredients
- Colorful veggies like bell peppers, carrots, and greens are full of antioxidants. These help fight off harmful free radicals and keep you healthy.
- Tomatoes, with their lycopene, are great for immune-boosting soups.
- Herbs and spices like turmeric, rosemary, and thyme add antioxidants to your soup.
Seasonal Vegetable Options
Using seasonal produce is good for local farms and your soups. It makes them fresh and full of nutrients. Try squash, sweet potatoes, and kale for vibrant, healthy soups.
| Ingredient | Immune-Boosting Properties |
|---|---|
| Garlic | Rich in allicin, with antimicrobial and antiviral effects |
| Ginger | Contains antioxidants and anti-inflammatory compounds |
| Bell Peppers | High in vitamin C and other antioxidants |
| Carrots | Contain beta-carotene, which supports immune function |
| Leafy Greens | Rich in vitamins, minerals, and antioxidants |
Adding these immune-boosting ingredients to your soups makes them nourishing and tasty. They support your health and well-being.
Low-Calorie Soup Options for Weight Loss
Starting a healthier lifestyle often begins in the kitchen. Adding diet-friendly soups to your meals can help with weight management. These calorie-conscious recipes are tasty and full of nutrients, keeping you full and energized.
Looking to lose weight or keep a balanced diet? These low-calorie soups are a tasty and flexible choice. You can make a variety of soups, from vegetable broths to lentil and bean soups. They’re all packed with flavor and nutrients to support your health.
- Roasted Tomato and Basil Soup: This soup is bright and tangy, made with fresh tomatoes, basil, and garlic. It has 200 calories per serving.
- Zucchini Noodle Soup with Chicken: This soup uses zucchini noodles instead of pasta, cutting carbs and calories. It also has lean chicken for protein.
- Black Bean and Vegetable Soup: This soup is a mix of black beans, bell peppers, onions, and spices. It’s nutritious and has only 180 calories per bowl.
- Butternut Squash Bisque: This creamy soup is low in calories. It’s made with roasted butternut squash and warming spices.
| Soup Recipe | Calories per Serving | Protein (g) | Fiber (g) |
|---|---|---|---|
| Roasted Tomato and Basil Soup | 200 | 8 | 4 |
| Zucchini Noodle Soup with Chicken | 250 | 20 | 3 |
| Black Bean and Vegetable Soup | 180 | 12 | 8 |
| Butternut Squash Bisque | 190 | 5 | 6 |
Adding these diet-friendly soups to your meals can be comforting and support your weight management goals. Focus on using fresh ingredients and watch your portion sizes. These calorie-conscious recipes are great for a healthy diet.
Protein-Packed Soup Recipes for Athletes
As an athlete, you know how crucial good nutrition is. High-protein soups can be a big help. They offer a tasty way to get the amino acids your body needs. Here, we’ll look at some top protein-packed soup recipes for athletes and active people.
Plant-Based Protein Soups
Looking to eat more plant-based proteins? There are many tasty and healthy soup options. Lentil soup is a great choice, packed with fiber and nutrients. Chickpea and kale soup is also excellent, with protein from chickpeas and antioxidants from kale.
Lean Meat Soup Options
Lean meats fans have plenty of high-protein soup choices. Chicken noodle soup with shredded chicken breast is a classic. It offers lean protein and a nourishing broth. Beef and barley soup, with lean ground beef or sirloin, is another hearty option.
Post-Workout Recovery Recipes
Recovering from hard workouts is key for athletes. Protein-packed soups can be a big help. Try turkey and wild rice soup for a mix of lean turkey and complex carbs from wild rice. For a plant-based choice, creamy lentil and sweet potato soup is both nourishing and satisfying.
Adding these protein-packed soups to your diet can help meet your protein needs. They support muscle recovery and fuel your active life. Experiment with different ingredients and flavors to find your favorite high-protein soups.
International Healthy Soup Recipes
Discover a world of flavors with our global cuisine-inspired healthy soup recipes. Enjoy the rich tastes and cultural traditions from around the world. Plus, get the health benefits of making your own soups.
Try Japanese miso soup for its soothing warmth or Indian dahl for its complex aromas. These soups are a great way to explore new tastes and keep your body healthy. Learn about the special ingredients, spices, and cooking methods from different cultures.
Explore the Flavors of the World
- Authentic Thai Tom Yum Goong: A fragrant lemongrass-infused broth brimming with shrimp, mushrooms, and fresh herbs.
- Hearty Mexican Chicken Pozole: A traditional hominy-based soup featuring tender chicken, vibrant chilies, and a tantalizing array of toppings.
- Nourishing Italian Minestrone: A vegetable-packed soup that celebrates the bounty of the Mediterranean, with a touch of Parmesan for depth of flavor.
| Soup Recipe | Key Ingredients | Health Benefits |
|---|---|---|
| Peruvian Quinoa Soup | Quinoa, vegetables, chicken broth | High in protein, fiber, and antioxidants |
| Korean Kimchi Stew | Kimchi, tofu, ginger, garlic | Supports gut health and immune function |
| Greek Avgolemono Soup | Chicken broth, eggs, lemon | Provides a source of protein and vitamin C |
Check out our collection of international healthy soup recipes. They offer a taste of global cuisine, cultural flavors, and ethnic dishes. Enjoy these delicious and nutritious soups that will nourish your body and please your taste buds.
Time-Saving Soup Preparation Tips
Finding time to cook healthy meals can be tough. But, with a few easy tips, you can make delicious, nutritious soups quickly. This way, you can enjoy homemade meals every day.
Batch Cooking Methods
Batch cooking is a great time-saver. Spend a few hours on the weekend making your favorite soups in bulk. This method gives you a steady supply of healthy soups and saves you time during the week.
- Double or triple your soup recipes to create multiple servings.
- Portion the soup into individual or family-sized containers for easy reheating.
- Freeze the soup in airtight containers or freezer-safe bags for up to 3 months.
Storage and Freezing Guidelines
Storing and freezing your soups right is crucial. It keeps them fresh and flavorful. Here’s how to do it:
- Allow soups to cool completely before storing or freezing.
- Use airtight containers or freezer-safe bags to prevent freezer burn.
- Label each container with the soup name, date, and portion size.
- Thaw frozen soups in the refrigerator overnight before reheating.
With these tips, making homemade, freezer-friendly soups is easy. Start batch cooking today. Enjoy your evenings with tasty, healthy soups.
Common Soup Making Mistakes to Avoid
Making homemade soups can be a fun and rewarding experience. But, even skilled cooks can run into problems. Knowing the common cooking errors and troubleshooting tips can help you make the perfect soup consistency and seasoning.
One big mistake is overseasoning. Too much salt, spices, or herbs can ruin the taste. Start with a little seasoning and add more as needed to get it just right.
- Taste your soup often while it cooks and adjust the seasonings.
- Watch the salt in broth or stock, as it adds a lot to the flavor.
- Try low-sodium or unsalted broth or stock to control the flavor better.
Getting the right soup consistency can also be tricky. Soups can be too thin or too thick. Pay attention to the liquid to solid ratio. Use thickening agents like roux, purees, or cornstarch if it’s too thin.
| Issue | Solution |
|---|---|
| Thin, Watery Soup | Simmer the soup longer to allow the ingredients to release their natural thickening agents, or add a roux or cornstarch slurry. |
| Thick, Heavy Soup | Add more broth or stock to thin out the consistency, or dilute with water or milk. |
By avoiding common cooking errors and focusing on seasoning and troubleshooting, you can improve your soup-making skills. This way, you’ll always make delicious, balanced soups.
Conclusion
Homemade soups are a treasure trove of health benefits. They keep nutrients fresh and offer hydration and digestive health. These nourishing bowls add variety and satisfaction to your diet.
Whether you’re new to cooking or experienced, you can make delicious soups. Try different bases, broths, and veggies to find your favorites. This will help you grow your cooking skills.
Adding immune-boosters, low-calorie, and protein-rich ingredients to your soups can help you reach your health goals. Whether it’s losing weight, recovering from exercise, or just feeling good, soups can help. Discover international flavors and recipes to make your meals exciting and healthy.

FAQ
What are the health benefits of homemade soups?
Homemade soups are great for your health. They keep nutrients from fresh ingredients. They also help you stay hydrated and support your digestion.
Plus, they can help you manage your weight. This is because they are filling and have fewer calories.
What are the essential kitchen tools for perfect soup making?
To make perfect soups, you need the right tools. You’ll need good pots, sharp knives, and appliances like immersion blenders. These tools help you get the best results.
How do I create flavorful soup bases and broths?
Start by learning to make tasty vegetable stocks and bone broths. Understanding the difference between clear and cream-based soups is also key.
What are some beginner-friendly healthy soup recipes?
We have simple yet tasty soup recipes for beginners. They use easy-to-find ingredients and techniques. This helps beginners feel more confident in the kitchen.
How can I incorporate immune-boosting ingredients into my soups?
Find out how to make soups that boost your immune system. Use ingredients like garlic and ginger. Also, add foods rich in antioxidants and seasonal veggies for a healthy soup.
What are some low-calorie soup options for weight loss?
We have low-calorie soup recipes for those trying to lose weight. These soups are filling, nutritious, and delicious. They keep calories low.
What are the best protein-packed soup recipes for athletes?
Check out our protein-rich soup recipes for athletes. We have plant-based and lean meat options. Plus, post-workout soups to help with muscle repair.
Where can I find healthy soup recipes from around the world?
Explore healthy soup recipes from around the globe. Discover new flavors and ingredients. It’s a fun way to stay healthy and try new things.
How can I save time when preparing homemade soups?
Learn how to make soups quickly and efficiently. We’ll show you batch cooking and storage tips. This way, you can make healthy soups without spending too much time.
What common mistakes should I avoid when making soups?
Find out how to avoid common soup-making mistakes. We’ll cover issues like overseasoning and texture problems. This will help you make perfect soups every time.