Cooking chicken legs to perfection can be a challenge, but it’s a skill worth mastering. Did you know that undercooked or overcooked chicken can be a serious health risk? In fact, according to the USDA, foodborne illnesses from poultry affect millions of people each year.
Knowing the right cooking time is crucial to achieving juicy and flavorful results. Whether you’re a seasoned chef or a beginner in the kitchen, understanding the basics of cooking chicken leg is essential.
Table of Contents
Key Takeaways
- Understand the importance of cooking chicken legs to the right temperature.
- Learn the factors that affect cooking time.
- Discover the recommended cooking times for different types of chicken legs.
- Get tips for achieving perfectly cooked chicken legs.
- Avoid common mistakes that can lead to overcooked or undercooked chicken.
The Basics of Baking Chicken Legs
Mastering the basics of baking chicken legs is essential for achieving perfectly cooked, mouth-watering results. Baking chicken legs is a popular cooking method because it allows for even cooking and browning, resulting in a crispy exterior and juicy interior. Oven-baked chicken legs are not only delicious but also relatively easy to prepare, making them a staple in many households.
Why Chicken Legs Are Popular for Baking
Chicken legs are a favorite among home cooks for several reasons. They are affordable and versatile, making them suitable for a variety of recipes. According to a culinary expert, “Chicken legs are incredibly forgiving, making them perfect for novice cooks.” Their popularity can also be attributed to the tender meat and the ease with which they can be seasoned and cooked to perfection.
Understanding Chicken Leg Anatomy: Drumsticks vs. Thighs
Understanding the anatomy of chicken legs is crucial for effective baking. Chicken legs consist of two main parts: drumsticks and thighs. Drumsticks are the lower portion of the leg, known for their meaty texture and ease of cooking. Thighs, on the other hand, are the upper portion, often preferred for their juiciness and flavor. Knowing the difference between these two parts can help in preparing them appropriately for baking, ensuring that both are cooked to perfection.
How Long to Bake Chicken Legs: Time and Temperature Guide
Achieving succulent baked chicken legs requires a grasp of the ideal cooking duration and oven temperature. The cooking time for chicken legs can vary significantly based on whether they are bone-in or boneless, as well as the temperature of your oven.
Baking at 350°F (175°C)
Baking chicken legs at 350°F is a popular choice as it provides a good balance between cooking time and the risk of overcooking. At this temperature, you can achieve juicy and tender results.
Bone-in Chicken Legs
For bone-in chicken legs, bake for approximately 45-50 minutes. This duration allows for the heat to penetrate through the bone and cook the meat thoroughly.
Boneless Chicken Legs
Boneless chicken legs, being denser, require about 30-35 minutes at 350°F. The absence of bones means they cook faster, but it’s essential to check for doneness.
Baking at 375°F (190°C)
Increasing the temperature to 375°F reduces the cooking time. For bone-in chicken legs, bake for about 35-40 minutes, while boneless legs require around 25-30 minutes.
Baking at 400°F (205°C)
Baking at 400°F is ideal for those who prefer a crisper exterior. Bone-in legs take about 30-35 minutes, and boneless legs take approximately 20-25 minutes.
Here’s a summary of the baking times at different temperatures:
| Temperature | Bone-in Chicken Legs | Boneless Chicken Legs |
|---|---|---|
| 350°F (175°C) | 45-50 minutes | 30-35 minutes |
| 375°F (190°C) | 35-40 minutes | 25-30 minutes |
| 400°F (205°C) | 30-35 minutes | 20-25 minutes |
Preparing Chicken Legs for the Oven
Preparing chicken legs for the oven involves a few key steps that can make a significant difference in the final outcome. Proper preparation ensures that the chicken legs bake evenly and are both flavorful and tender.
Washing and Patting Dry
The first step in preparing chicken legs is to wash them under cold water, removing any impurities or debris. After washing, it’s essential to pat the chicken legs dry with paper towels. This step is crucial because it removes excess moisture, which helps the chicken bake more evenly and can improve the texture of the skin.
Trimming Excess Fat and Skin
Trimming excess fat and skin from the chicken legs can enhance the overall quality of the baked chicken. Use a sharp knife to remove any visible fat or loose skin. This not only makes the chicken healthier but also helps in achieving a crisper exterior during baking.
Bringing to Room Temperature
Before baking, it’s recommended to bring the chicken legs to room temperature. This step helps the chicken cook more evenly, as it reduces the temperature gradient between the inside and the outside of the meat. Simply leave the chicken legs on the counter for about 30 minutes to 1 hour before baking.
| Preparation Step | Importance | Benefit |
|---|---|---|
| Washing and Patting Dry | High | Even baking and crispy skin |
| Trimming Excess Fat and Skin | Medium | Healthier and crisper chicken |
| Bringing to Room Temperature | High | Even cooking |
Essential Equipment for Perfect Baked Chicken Legs
To bake chicken legs to perfection, you’ll need some essential tools. The right equipment can elevate your baking game and ensure your chicken is cooked to a safe internal temperature while achieving the desired texture and flavor.
Baking Sheets and Roasting Pans
A sturdy baking sheet or roasting pan is necessary for baking chicken legs. These pans allow for even heat distribution and can withstand high oven temperatures. Look for pans with a non-stick coating or use parchment paper to prevent sticking.
Wire Racks and Their Benefits
Using a wire rack on your baking sheet can improve air circulation around the chicken legs, promoting even cooking and crisping. This setup helps to prevent the chicken from steaming instead of browning.
Meat Thermometers: Your Best Friend
A meat thermometer is crucial for ensuring your chicken legs are cooked to a safe internal temperature. It’s the most accurate way to check for doneness, taking the guesswork out of cooking.
Basic Seasoning Techniques for Flavorful Chicken Legs
To achieve mouth-watering baked chicken legs, mastering basic seasoning techniques is crucial. Seasoning not only enhances the flavor but also contributes to the overall texture and appearance of the chicken.
Dry Rubs and Spice Blends
Dry rubs and spice blends are a simple yet effective way to add flavor to your chicken legs. They work by creating a crust on the surface that locks in juices.
Store-Bought Options
For convenience, you can use store-bought dry rubs and spice blends. Many brands offer a variety of flavors, from classic barbecue to spicy Cajun.
Homemade Spice Mixes
Creating your own spice mixes allows for customization. A basic mix might include paprika, garlic powder, onion powder, salt, and pepper. Experiment with different herbs and spices to find your perfect blend.
Marinades and Their Impact on Cooking Time
Marinades can significantly enhance the flavor and tenderness of chicken legs. However, they can also affect cooking time. Acidic ingredients in marinades, like vinegar or citrus, can help tenderize the meat but may require adjustments in baking time.
Brining for Extra Juiciness
Brining involves soaking the chicken in a saltwater solution before baking. This technique can result in juicier chicken legs. A basic brine can be made with water, salt, and sugar, with optional flavorings like herbs and spices.
Step-by-Step Guide to Baking Chicken Legs
To achieve deliciously baked chicken legs, follow this straightforward guide. Baking chicken legs can be a straightforward process when broken down into manageable steps.
Preheating Your Oven Properly
Preheating your oven is the first crucial step in baking chicken legs. Ensure your oven is set to the correct temperature, whether it’s 350°F, 375°F, or 400°F, depending on your recipe’s requirements. A properly preheated oven ensures even cooking.
Arranging Chicken Legs for Even Cooking
Arrange the chicken legs on a baking sheet or roasting pan in a single layer, leaving space between each leg for air to circulate. This arrangement promotes even cooking and helps achieve crispy skin.

When and How to Flip During Baking
Flipping the chicken legs halfway through the baking time can help achieve even browning and crispiness. Use tongs or a spatula to carefully turn the legs, taking care not to tear the skin.
Applying Glazes and Sauces
For added flavor, apply glazes and sauces during the last 10-15 minutes of baking. This timing prevents the glaze from burning and allows it to caramelize, enhancing the flavor and appearance of the chicken.
Resting After Baking
Once the chicken legs are done, remove them from the oven and let them rest for a few minutes. This resting period allows the juices to redistribute, making the chicken more tender and juicy.
| Step | Description | Timing |
|---|---|---|
| Preheating | Set oven to desired temperature | Before baking |
| Arranging | Place chicken legs in a single layer | Before baking |
| Flipping | Turn chicken legs for even browning | Halfway through baking |
| Glazing | Apply glazes and sauces | Last 10-15 minutes |
| Resting | Let chicken rest | After baking |
How to Tell When Chicken Legs Are Done
Knowing when your chicken legs are fully cooked can be the difference between a delicious meal and a foodborne illness. Ensuring they are done correctly is crucial for both taste and safety.
Visual Indicators of Doneness
One way to check if chicken legs are done is by looking for visual indicators. The skin should be golden brown, and the meat should appear opaque and firm to the touch. However, relying solely on visual cues can be misleading as they can vary depending on the cooking method and seasonings used.
Using a Meat Thermometer Correctly
The most accurate way to determine if chicken legs are cooked is by using a meat thermometer. This method eliminates guesswork and ensures food safety.
Safe Internal Temperature
The USDA recommends cooking chicken to an internal temperature of at least 165°F (74°C). This temperature ensures that harmful bacteria are killed, making the chicken safe to eat.
Where to Insert the Thermometer
To get an accurate reading, insert the thermometer into the thickest part of the chicken leg, avoiding any bones or fat. This provides a true internal temperature reading.
The Juice Test
Another method to check for doneness is the juice test. When you cut into the thickest part of the chicken leg, the juices should run clear. If the juices are pink or red, the chicken needs more cooking time.
| Method | Description | Accuracy |
|---|---|---|
| Visual Inspection | Checking the color and firmness of the meat | Medium |
| Meat Thermometer | Using a thermometer to check internal temperature | High |
| Juice Test | Checking if the juices run clear | Medium |
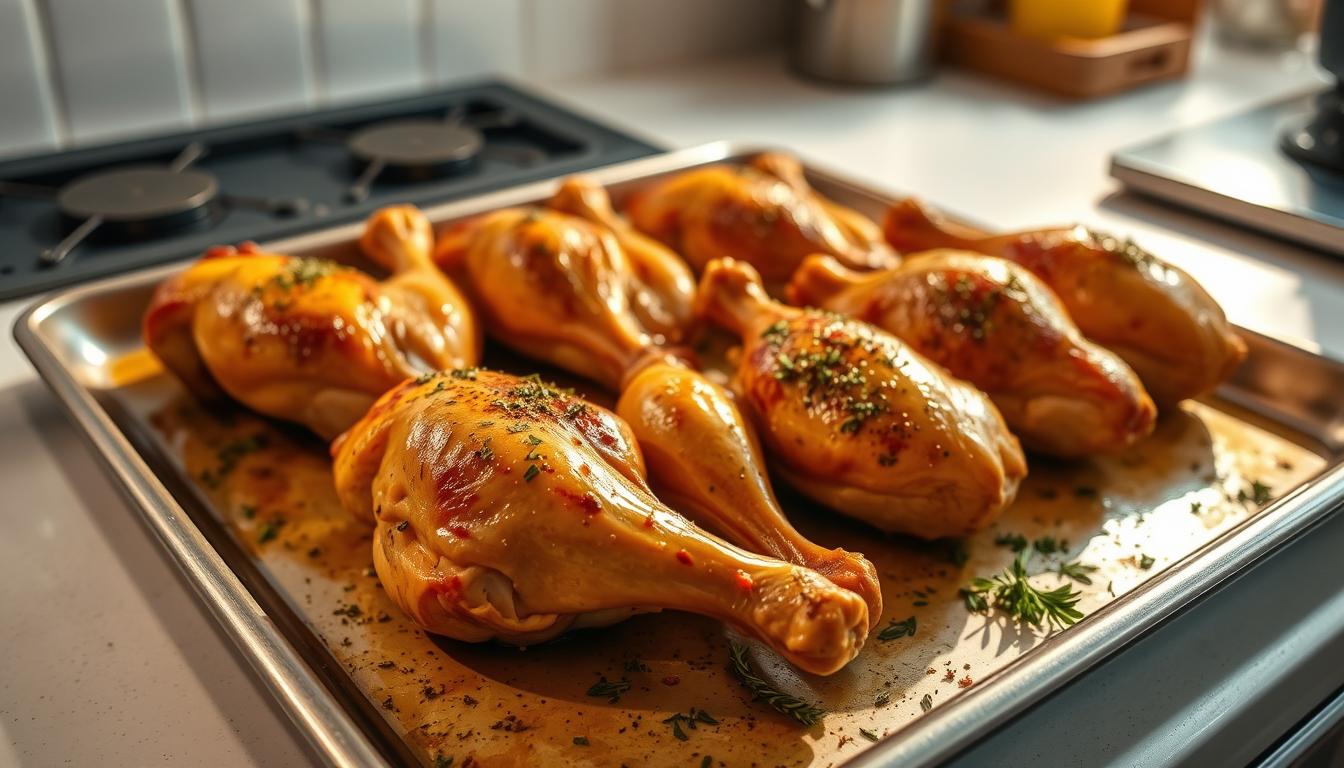
Achieving Crispy Skin on Baked Chicken Legs
Crispy skin on baked chicken legs can elevate a simple dish to a gourmet meal. The key to achieving this lies in a combination of preparation techniques and cooking methods.
Dry Skin Technique
Drying the skin before baking is a crucial step in achieving crispiness. Pat the chicken legs dry with paper towels, both under and on top of the skin, to remove excess moisture. Letting them air dry in the refrigerator for a few hours can further enhance the drying effect.
Baking Powder Secret
Using baking powder can be a game-changer for crispy skin. Sprinkle a mixture of baking powder and your favorite seasonings under the skin or on it. The baking powder helps to dry out the skin, resulting in a crisper texture when baked.
Broiling Method
For an extra crispy finish, try broiling the chicken legs for the last few minutes of baking. This method adds a golden-brown color and crunch to the skin. Keep a close eye to prevent burning, as the skin can go from perfectly toasted to burnt quickly.
By incorporating these techniques into your baking routine, you can achieve that perfect crispy skin on your baked chicken legs. As Chef Gordon Ramsay once said, “The secret to cooking is to know when to stop; don’t overdo it.” This is particularly true when aiming for crispy skin, as overcooking can lead to dryness.
Food Safety When Cooking Chicken Legs
Ensuring food safety when cooking chicken legs is crucial to prevent foodborne illnesses. Handling and cooking chicken properly are key to a safe and enjoyable meal.

Preventing Cross-Contamination
To prevent cross-contamination, it’s essential to separate raw chicken from other foods and surfaces. Use separate cutting boards and utensils for raw chicken, and wash your hands thoroughly before and after handling it.
Safe Handling Practices
Safe handling practices include storing raw chicken in sealed containers at the bottom of the refrigerator to prevent juices from dripping onto other foods. Always check the expiration dates and look for any signs of spoilage.
Minimum Safe Cooking Temperatures
Cooking chicken legs to the right temperature is critical. Use a meat thermometer to ensure they reach an internal temperature of at least 165°F (74°C). This is the minimum safe cooking temperature to kill harmful bacteria.
By following these guidelines, you can significantly reduce the risk of foodborne illnesses associated with undercooked or improperly handled chicken legs.
Common Mistakes When Baking Chicken Legs
To achieve perfectly baked chicken legs, it’s crucial to steer clear of frequent mistakes. Baking chicken legs can be a simple and rewarding process if done correctly. However, several common errors can lead to less-than-desirable results.
Overcrowding the Pan
One of the most common mistakes is overcrowding the baking pan. When chicken legs are too close together, it can prevent even cooking and lead to steaming instead of browning. To avoid this, ensure that there is enough space between each piece for air to circulate.
Skipping the Preheating Step
Another critical mistake is skipping the preheating step. Preheating the oven ensures that it reaches the correct temperature, which is essential for cooking the chicken evenly. Skipping this step can result in undercooked or overcooked chicken.
Baking Straight from the Refrigerator
Baking chicken legs straight from the refrigerator is also a mistake. Cold chicken takes longer to cook and can lead to uneven cooking. It’s recommended to let the chicken come to room temperature before baking to ensure that it cooks more evenly.
By avoiding these common mistakes, you can achieve perfectly baked chicken legs that are juicy and flavorful. Remember, attention to detail is key to successful baking.
Delicious Recipes for Baked Chicken Legs
Baking chicken legs is an art that combines ease with the potential for complex and satisfying flavors. With a few simple ingredients and some basic techniques, you can create mouth-watering dishes that are sure to please. Here are some delicious recipes to get you started.
Classic Herb and Garlic Chicken Legs
This timeless recipe is a staple for a reason. It combines the simplicity of garlic with the freshness of herbs, creating a flavor profile that’s both comforting and sophisticated.
Ingredients
- 4 chicken legs
- 2 cloves of garlic, minced
- 1 tablespoon olive oil
- 1 tablespoon chopped fresh rosemary
- 1 tablespoon chopped fresh thyme
- Salt and pepper to taste
Preparation Steps
- Preheat oven to 400°F (205°C).
- Mix garlic, olive oil, rosemary, thyme, salt, and pepper in a bowl.
- Add chicken legs to the bowl and coat evenly.
- Bake for 30-35 minutes or until cooked through.
Honey Mustard Glazed Chicken Legs
For a sweeter take on baked chicken legs, try a honey mustard glaze. This recipe adds a tangy and sweet dimension that’s perfect for those looking for a different flavor profile.
- 4 chicken legs
- 1/4 cup honey
- 2 tablespoons Dijon mustard
- 1 tablespoon olive oil
Spicy Buffalo Style Chicken Legs
If you like a bit of heat, spicy buffalo style chicken legs are a great option. This recipe is perfect for those who enjoy spicy food and are looking for a flavorful twist on traditional baked chicken.
- 4 chicken legs
- 1/2 cup buffalo sauce
- 1 tablespoon butter
Serving Suggestions and Side Dishes
Baked chicken legs can be served with a variety of side dishes, from roasted vegetables to mashed potatoes. Consider pairing with a fresh salad or grilled asparagus for a well-rounded meal.
Conclusion
Achieving juicy baked chicken legs is a matter of understanding the right baking techniques, seasoning methods, and food safety practices. By following the guidelines outlined in this article, you can elevate your cooking skills and impress your family and friends with deliciously baked chicken legs.
To recap, we’ve covered the basics of baking chicken legs, including the ideal baking times and temperatures, preparation techniques, and essential equipment. We’ve also explored various seasoning methods, such as dry rubs, marinades, and brining, to add flavor to your chicken legs.
By applying these baking tips, you’ll be able to achieve perfectly cooked, juicy baked chicken legs every time. Remember to always prioritize food safety by handling and cooking your chicken legs properly.
With practice and patience, you’ll become a pro at baking chicken legs, and your dishes will be the envy of everyone around you. So, get baking and enjoy the delight of perfectly cooked, juicy baked chicken legs!
FAQ
How long should I bake chicken legs in the oven?
The baking time for chicken legs depends on the temperature and whether they are bone-in or boneless. At 400°F (205°C), bone-in chicken legs typically take around 35-40 minutes to cook, while boneless chicken legs take about 25-30 minutes.
What is the best temperature for baking chicken legs?
The ideal temperature for baking chicken legs is between 350°F (175°C) and 400°F (205°C). Baking at 375°F (190°C) is also a good option, as it provides a nice balance between cooking time and crispy skin.
How do I achieve crispy skin on baked chicken legs?
To achieve crispy skin, you can try drying the skin before baking, using baking powder, or broiling the chicken legs for a few minutes after baking. These techniques help to crisp up the skin and add texture.
Can I bake chicken legs straight from the refrigerator?
It’s recommended to bring chicken legs to room temperature before baking to ensure even cooking. Baking straight from the refrigerator can lead to uneven cooking and potentially undercooked or overcooked areas.
How do I know when chicken legs are done baking?
You can check for doneness by using a meat thermometer, visual indicators, or the juice test. The internal temperature should reach 165°F (74°C) for safe consumption. Visual indicators include checking for white, firm meat, and the juice test involves checking if the juices run clear.
What are some common mistakes to avoid when baking chicken legs?
Common mistakes include overcrowding the pan, skipping the preheating step, and baking straight from the refrigerator. Avoiding these mistakes will help ensure that your chicken legs are cooked evenly and safely.
Can I use a marinade or dry rub on my chicken legs before baking?
Yes, using a marinade or dry rub can add flavor to your chicken legs. However, be aware that marinades can affect cooking time, and it’s essential to pat dry the chicken before baking to achieve crispy skin.
What are some recommended side dishes to serve with baked chicken legs?
You can serve baked chicken legs with a variety of side dishes, such as roasted vegetables, mashed potatoes, or a fresh salad. Some recipes also suggest serving with a glaze or sauce, like honey mustard or buffalo sauce.